In this article, Audiomovers product specialist Eddie Pitman walks through the Dolby Atmos QC process and how you can make sure your Atmos projects translate well on all platforms by setting up your Mac to be able to monitor Atmos projects in Apple Spatial.
Understanding how your mix or master sounds on different consumer devices and platforms is an integral part of the mixing/mastering process. From checking your mix on a set of NS10’s to the legendary ‘car stereo mix test’, quality control is a critical step to ensure your project translates well across all listening scenarios. You’ll want to verify your mix for everything from casual listening on a bluetooth speaker in the park to commuters tuning into the radio during their daily commute or someone playing music out of their phone on a busy train playing music out of their phone speaker annoying the commuters… (hopefully not the last one).
Dolby Atmos projects are no exception to this crucial quality control process. Platforms like Tidal and Amazon Music deliver Dolby Atmos to headphones using Dolby’s binauralization technology. Referencing this Dolby binaural output is relatively straightforward using their internal or external renderer. However, since Apple Music introduced Dolby Atmos support with its own proprietary Spatial Renderer (instead of Dolby’s binaural technology), the quality control (QC) process for Atmos production has become significantly more complex.
Be it routing from the Dolby Atmos Renderer into Logic Pro to monitor the Spatial render, or exporting an .MP4 and opening it on an iPhone for non-real time monitoring, the QC process of Atmos projects with Apple’s renderer was less than streamlined.
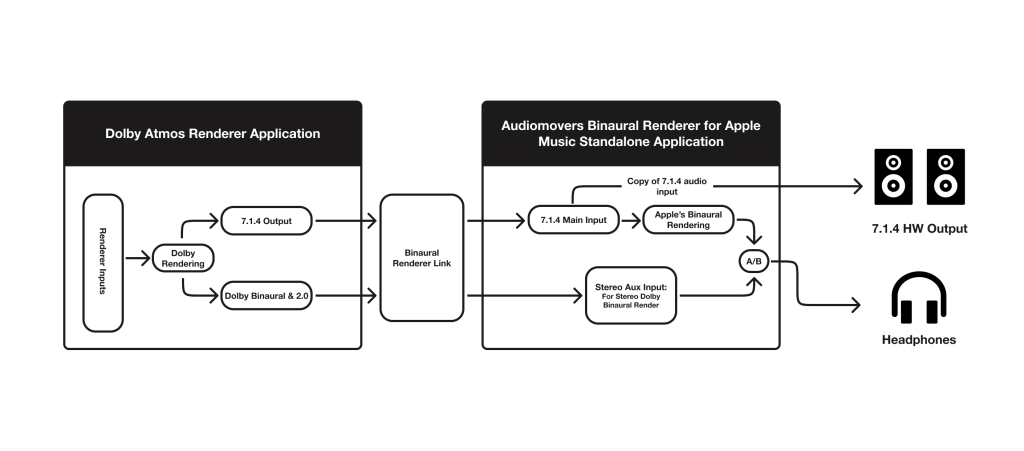
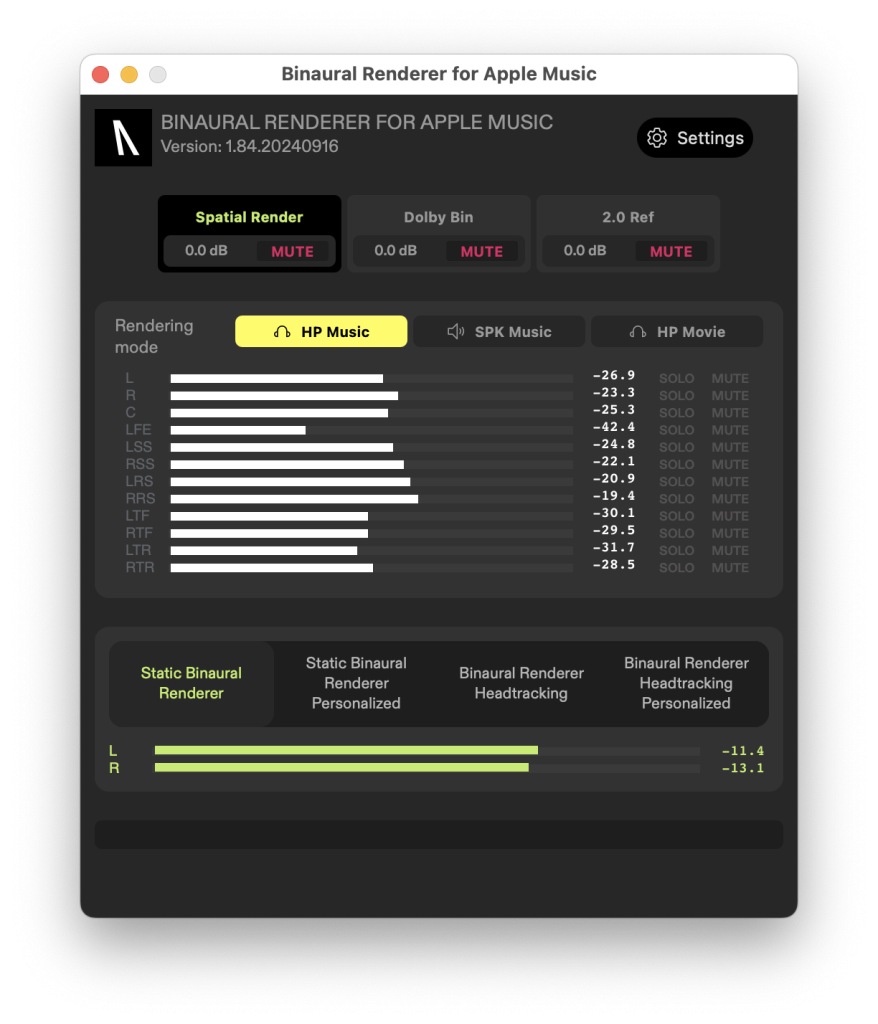
Built to address these workflow complexities, Audiomovers’ Binaural Renderer is an application and plugin that enables real-time monitoring of Apple’s Spatial Rendering on any headphones. This eliminates the need for the complex old workflows and allows producers and engineers to precisely hear how the end user will experience their project when listening on Apple Music. In this article, we’ll walk through setting up Binaural Renderer, covering both a standard 7.1.4 setup and more advanced configurations, including higher channel counts and live re-renders. But first, let’s quickly explain how Apple’s renderer works and why it’s important to reference through it.
Apple’s Internal Spatial Renderer:
Apple’s Spatial renderer works quite differently from Dolby’s binaural rendering.
Dolby’s Process: Dolby’s binauralization is generated within the Dolby Atmos renderer, allowing easy monitoring of your project’s Dolby binaural output. On streaming platforms that utilize Dolby’s binauralization for Dolby Atmos playback, the binaural rendering occurs on the streaming platform’s server. This server then streams a Dolby Left/Right (L&R) version to the app on your device, which then travels to your headphones.
Apple’s Process: Apple’s Spatial renderer works quite differently from Dolby’s binaural renderinApple’s Process: Apple Music’s Dolby Atmos support works quite differently. When listening to Dolby Atmos material on Apple Music, instead of a binauralized version being streamed from its server, Apple Music streams an ADM file (7.1.4 discrete channels, to be precise) directly to your Apple device. This ADM file is then rendered down toApple’s Process: Apple Music’s Dolby Atmos support works quite differently. When listening to Dolby Atmos material on Apple Music, instead of a binauralized version being streamed from its server, Apple Music streams an ADM file (7.1.4 discrete channels, to be precise) directly to your Apple device. This ADM file is then rendered down to an Apple Spatial format using Apple’s built-in renderer on the device itself, which then feeds a Left/Right Apple Spatial render to your headphones. This is why Binaural Renderer supports 7.1.4 inputs for the Spatial render and not higher channel configurations.
Apple’s Process: Apple’s Spatial renderer works quite differently from Dolby’s binaural renderinApple’s Process: Apple Music’s Dolby Atmos support works quite differently. When listening to Dolby Atmos material on Apple Music, instead of a binauralized version being streamed from its server, Apple Music streams an ADM file (7.1.4 discrete channels, to be precise) directly to your Apple device. This ADM file is then rendered down toApple’s Process: Apple Music’s Dolby Atmos support works quite differently. When listening to Dolby Atmos material on Apple Music, instead of a binauralized version being streamed from its server, Apple Music streams an ADM file (7.1.4 discrete channels, to be precise) directly to your Apple device. This ADM file is then rendered down to an Apple Spatial format using Apple’s built-in renderer on the device itself, which then feeds a Left/Right Apple Spatial render to your headphones. This is why Binaural Renderer supports 7.1.4 inputs for the Spatial render and not higher channel configurations.
The Apple Spatial Renderer also uses different profiles that adapt depending on the platform you’re listening to Atmos audio on.
Headphone Music Profile: The default Spatial profile used by Apple Music when listening to Atmos on supported Apple Headphones
Speaker Music Profile: This profile is used when listening to Dolby Atmos audio on Apple Music when the output device is set to Spatial Enabled Apple speakers (MacBook Pro speakers, Pro XDR display, iPhone/iPad, HomePod etc.)
Headphone TV Profile: This is the default profile for the AppleTV app when watching Film or TV with Atmos audio on supported Apple Headphones.
A key issue in Atmos mixing is that the Apple Spatial and Dolby Binaural renderers sound very different. This underscores the importance of checking your mix across various playback environments. With most people listening on headphones, different streaming services will deliver audibly distinct Atmos versions due to their unique binauralization processes. Therefore, ensuring your project translates well across both renderers is crucial. Essentially, it’s the new “car stereo mix” for Atmos.
Now that we’ve covered the basics of the technology, it’s a good time to walk through getting set up with the Binaural Renderer app. We’ll go through a couple of examples here, but let’s start with getting set up when using the external Dolby Renderer.
Basic Setup with the External Dolby Renderer:
This first setup is going to run through how to get audio from the external Dolby Renderer into the Binaural Renderer application.
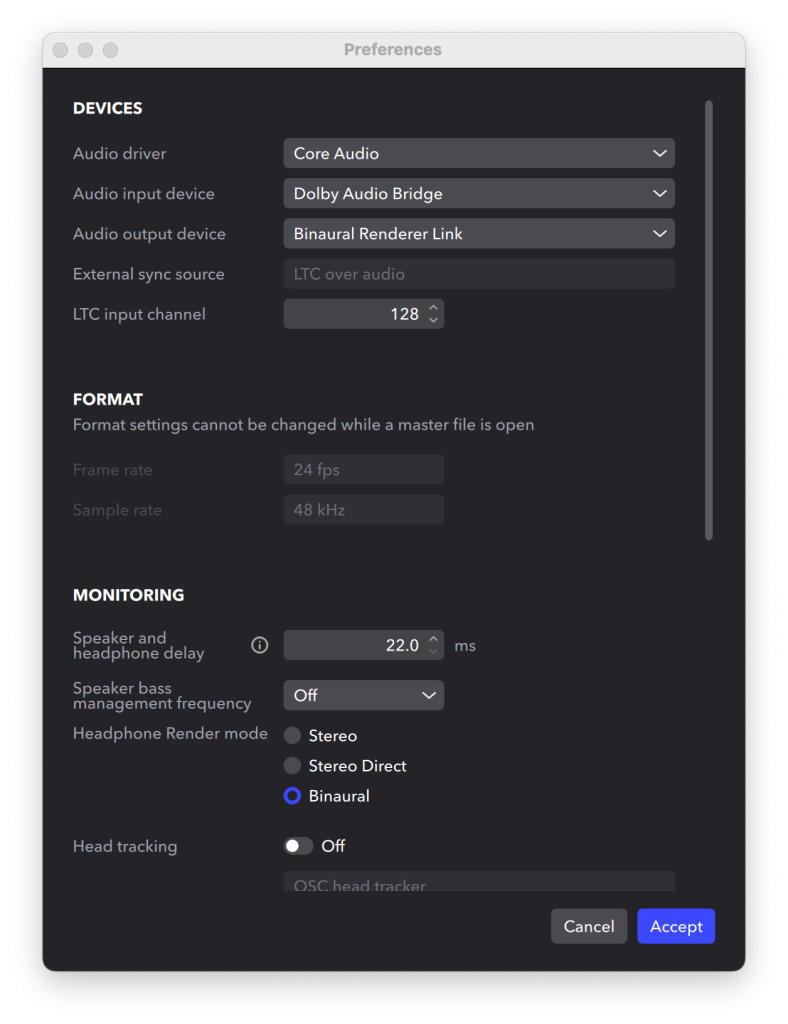
My current setup in the renderer is as follows. My speaker configuration is 7.1.4, running through outputs 1-12 of the Dolby Renderer, with my output device set to Binaural Renderer Link (a 16-channel virtual driver that comes with the Binaural Renderer installer).
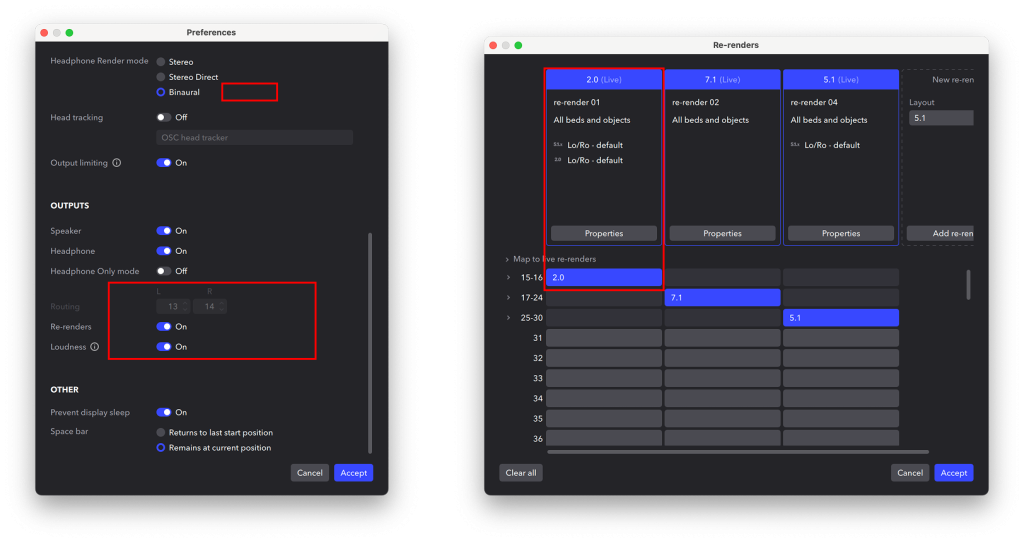
I then have a Dolby Binaural routed to outputs 13-14 and a 2.0 going to outputs 15-16. I’ve got them on these channels for ease of setup, but we can cover channel remapping later down the line.
Now that we’ve got our outputs in the Dolby Renderer configured, we can move on to the setup inside the Binaural Renderer application. Once you have the Binaural Renderer application set up, we’ll head into the settings tab to configure our inputs and outputs.
Firstly, we need to select the input device for the application to bridge the outputs from the Dolby Renderer to the Binaural Renderer application. Since we utilized the Binaural Renderer Link virtual driver as the renderer’s output, we’ll be able to select this as the application’s input to bridge the 7.1.4 discrete channels from the Dolby Renderer to the Binaural Renderer. However, for more advanced routing configurations you can use our tool OMNIBUS.

Once setup correctly, this will allow the 7.1.4 discrete channels from the Dolby Renderer to travel into the Binaural Renderer application.
You may notice that when no output device for the Binaural Renderer application is selected, no meters are present. This is to be expected as the Spatial renderer requires a render output destination to be assigned.
I’ve set my headphones as my output for the application, in this example, a pair of Bowers & Wilkins PX8’s. However, Binaural renderer’s Spatial output can be any audio device on your Mac.
Now this is setup, you’ll see my levels are moving and I am able to monitor my Atmos projects with Apple Spatial as I please. I can toggle between the auxiliary inputs to hear the 2.0 as well as the Dolby Binaural as well to get a clear understanding of how my project is going to translate for the end listener on different platforms.
Try Binaural Renderer now, and get a 7-day demo on us.